

Author: Amitabh Soni
Introduction
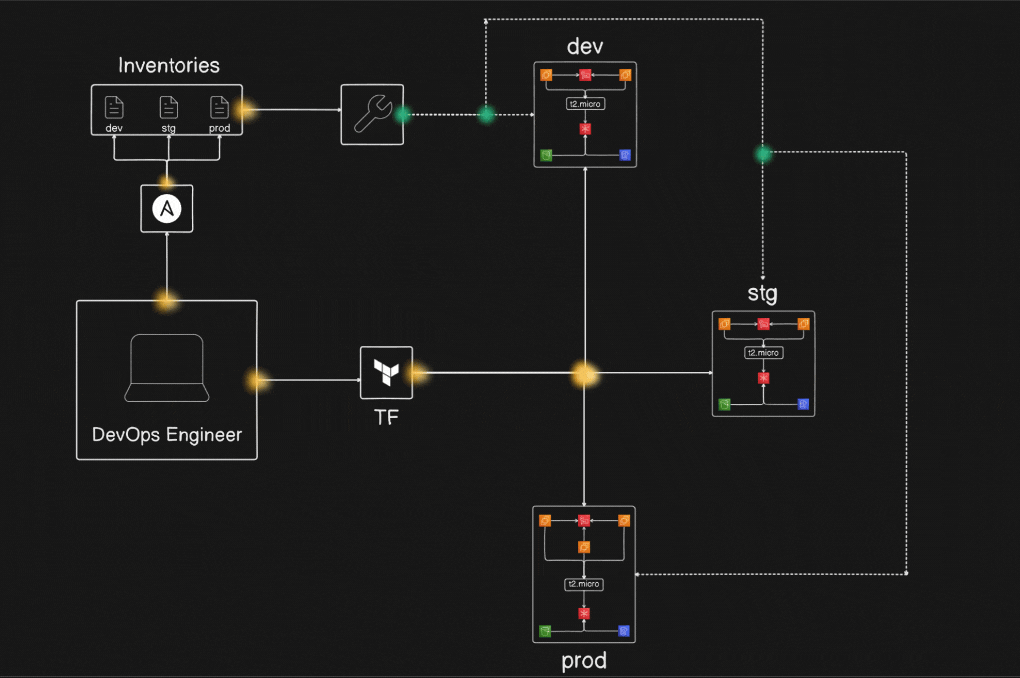
This comprehensive DevOps project demonstrates how to set up a robust, multi-environment infrastructure using Terraform for provisioning and Ansible for configuration management. The project covers creating infrastructure for development, staging, and production environments, with a focus on automation, scalability, and best practices.
Project Overview
The project involves:
- Installing Terraform and Ansible
- Setting up AWS infrastructure
- Creating dynamic inventories
- Configuring Nginx across multiple environments
- Automating infrastructure management
Project Diagram :
Prerequisites Before Installation
Before diving into the installation of Terraform and Ansible, ensure you have the following in place:
1. Setting Up the Ubuntu OS Environment
To install Terraform and Ansible, you need access to an Ubuntu 20.04 or 22.04 LTS environment. This environment can be:
- A local machine running Ubuntu OS.
- An AWS EC2 instance with Ubuntu as the operating system.
- A virtual machine (e.g., VirtualBox or VMware) running Ubuntu.
Provisioning an Ubuntu EC2 Instance (Optional)
If using AWS, follow these steps to set up an Ubuntu EC2 instance:
- Log in to the AWS Management Console.
- Navigate to EC2 > Launch Instances.
- Choose an Ubuntu AMI (e.g., Ubuntu 20.04 LTS).
- Select an instance type (e.g., t2.micro for free tier eligibility).
- Configure security groups to allow SSH, HTTP, and HTTPS access (ports 22, 80, 443).
- Launch the instance and connect to it using the following command:
ssh -i your-key.pem ubuntu@your-ec2-public-ip
2. AWS CLI
- Install and configure the AWS CLI to interact with AWS services.
- To install AWS CLI on Ubuntu, run:
sudo apt-get update sudo apt-get install awscli -y aws --version - Configure it using:
aws configure
Enter your Access Key ID, Secret Access Key, region, and output format when prompted.
3. Access Keys and Permissions
- Obtain AWS IAM Access Keys (Access Key ID and Secret Access Key) with appropriate permissions for Terraform to provision infrastructure.
- Ensure the IAM user or role has access to EC2, S3, and IAM resources.
4. AMI Information
- Have the AMI ID of the operating system image you plan to use.
- You can find this in the AWS Management Console or via AWS CLI:
aws ec2 describe-images --filters "Name=name,Values=your-ami-name"
5. Network Configurations
- Ensure you have details of your VPC, Subnet IDs, Security Groups, and Key Pairs.
- These are required for deploying resources in the desired network setup.
6. User Account with Sudo Privileges
- Ensure the user account has
sudoprivileges to install packages and make system-level changes.
7. Basic Knowledge of YAML and HCL
- Ansible uses YAML for playbooks, while Terraform uses HCL (HashiCorp Configuration Language) for infrastructure definitions.
1. Installing Terraform and Ansible
a. Installing Terraform on Ubuntu
Follow these steps to install Terraform on Ubuntu:
- Update the Package List
sudo apt-get update - Install Dependencies
sudo apt-get install -y gnupg software-properties-common - Add HashiCorp’s GPG Key
curl -fsSL https://apt.releases.hashicorp.com/gpg | sudo gpg --dearmor -o /usr/share/keyrings/hashicorp-archive-keyring.gpg - Add the HashiCorp Repository
echo "deb [signed-by=/usr/share/keyrings/hashicorp-archive-keyring.gpg] https://apt.releases.hashicorp.com $(lsb_release -cs) main" | sudo tee /etc/apt/sources.list.d/hashicorp.list - Install Terraform
sudo apt-get update && sudo apt-get install terraform - Verify the Installation
terraform --version

b. Installing Ansible on Ubuntu
Ansible simplifies configuration management and automation. To install it:
- Add the Ansible PPA
sudo apt-add-repository ppa:ansible/ansible - Update the Package List
sudo apt update - Install Ansible
sudo apt install ansible - Verify the Installation
ansible --version

2. Creating Directories for Terraform and Ansible
To keep your infrastructure code and server configuration scripts organized, create two separate directories: one for Terraform and another for Ansible.
- Navigate to Your Project Directory (or create a new one):
mkdir <your-project-name> && cd <your-project-name> - Create a Directory for Terraform:
mkdir terraform - Create a Directory for Ansible:
mkdir ansible - Verify the Directory Structure:
tree
Your project structure should look like this:
<your-project-name>/
 ├── terraform/
 └── ansible/
With this structure, you can separate your Terraform scripts (infrastructure provisioning) and Ansible playbooks (server configuration) efficiently.
3. Setting Up Infrastructure Directory in Terraform (With File Content)
After creating the infra directory, add basic configurations to each Terraform file to provision essential AWS resources.
Steps to Create the Infrastructure Directory and Add File Content
- Navigate to the Terraform Directory:
cd terraform - Create the
infraDirectory:mkdir infra && cd infra - Create and Populate the Terraform Files: below is code which i have used to create infrastructure structure to accomplish project pattern
a. bucket.tf (S3 Bucket Configuration)
resource "aws_s3_bucket" "my_s3_bucket" {
  bucket = "${var.env}-amitabh-devops-bucket"

  tags = {
    Name = "${var.env}-amitabh-devops-bucket"
    Environment = var.env
  }
}
b. dynamodb.tf (DynamoDB Table for State Locking)
resource "aws_dynamodb_table" "my_table" {
  name = "${var.env}-devops-db-table"
  billing_mode = "PAY_PER_REQUEST"
  hash_key = "userId"

  attribute {
    name = "userId"
    type = "S"
  }

  tags = {
    Name = "${var.env}-devops-db"
    Environment = var.env
  }
}
c. ec2.tf (EC2 Instance Configuration)
# Fetch the AMI for the instance based on specified filters
data "aws_ami" "ubuntu" {
    owners      = [var.aws_ami_owners]
    most_recent = true

    filter {
        name   = "name"
        values = [var.aws_instance_os_distro]
    }

    filter {
        name   = "state"
        values = ["available"]
    }
}


resource "aws_key_pair" "my_key_pair" {
  key_name = "${var.env}-devops-key"
  public_key = file("devops-key.pub")
}

resource "aws_default_vpc" "default" {

}

resource "aws_security_group" "my_sg" {
  name = "${var.env}-devops-sg"
  description = "This is security for every instance"
  vpc_id = aws_default_vpc.default.id

  ingress {
    description = "Allow access to port 22 for ssh"
    from_port = 22
    to_port = 22
    protocol = "tcp"
    cidr_blocks = [ "0.0.0.0/0" ]
  }
  ingress {
    description = "Allow access to port 80 for http"
    from_port = 80
    to_port = 80
    protocol = "tcp"
    cidr_blocks = [ "0.0.0.0/0" ]
  }
  ingress {
    description = "Allow access to port 443 for https"
    from_port = 443
    to_port = 443
    protocol = "tcp"
    cidr_blocks = [ "0.0.0.0/0" ]
  }
  egress {
    description = "Allow access to every port for outgoing"
    from_port = 0
    to_port = 0
    protocol = "-1"
    cidr_blocks = [ "0.0.0.0/0" ]
  }


  tags = {
    Name = "${var.env}-devops-sg"
    Enviroment = var.env
  }

}


resource "aws_instance" "my_instance" {
    count = var.instance_count
    ami = data.aws_ami.ubuntu.id
    instance_type = var.instance_type
    key_name = aws_key_pair.my_key_pair.key_name
    security_groups = [aws_security_group.my_sg.name]

    root_block_device {
      volume_size = var.instance_volume_size
      volume_type = "gp3"
    }

    tags = {
      Name = "${var.env}-devops-instance"
      Enviroment = var.env
    }
}
d. output.tf (Output Definitions)
output "instance_public_ips" {
  description = "This is used to show all env's servers public ips"
  value = aws_instance.my_instance[*].public_ip
}
e. variable.tf (Variable Declarations)
variable "env" {
  description = "This is env variable like dev,stg,prod"
  type = string
}

variable "instance_type" {
  description = "This is Instance type like t2.micro, t2.medium etc.."
  type = string
}

variable "instance_count" {
  description = "This contain the instance count for the every enviroment"
  type = number
}

variable "instance_volume_size" {
  description = "This contain the size of every instance should be"
  type = number
}

variable "aws_instance_os_distro" {
  description = "Defines the operating system image filter for selecting an appropriate AMI (e.g., Ubuntu 20.04)."
  type        = string
  default     = "ubuntu/images/hvm-ssd/*amd64*"
}

variable "aws_ami_owners" {
  description = "The owner ID of the AMI to use. Default is Canonical (for Ubuntu AMIs)."
  type        = string
  default     = "099720109477"
}- Verify the File Structure and Content:
tree
Your structure should look like this:
infra/
├── bucket.tf
├── dynamodb.tf
├── ec2.tf
├── output.tf
└── variable.tf
Each file now contains sample resource configurations which i have used to create that project. You can modify the values in variable.tf to fit your project’s requirements.
4. Going Back to Terraform Directory and Adding Main Infrastructure Files
1. Go Back to the Terraform Directory
cd ..2. Create the main.tf File (Using Modules for Multi-Environment Setup)
The main.tf file will include the configuration to call your infra module and create resources for the dev, stage, and prod environments.CopyCopy
# dev-infrastructure
module "dev-infra" {
  source = "./infra"
  env = "dev"
  instance_count = 2
  instance_type = "t2.micro"
  instance_volume_size = 8
}

# stg-infrastructure
module "stg-infra" {
  source = "./infra"
  env = "stg"
  instance_count = 2
  instance_type = "t2.micro"
  instance_volume_size = 8
}

# prod-infrastructure
module "prod-infra" {
  source = "./infra"
  env = "prod"
  instance_count = 3
  instance_type = "t2.micro"
  instance_volume_size = 8
}


output "dev_infra_instance_public_ips" {
  value = module.dev-infra.instance_public_ips
}

output "stg_infra_instance_public_ips" {
  value = module.stg-infra.instance_public_ips
}

output "prod_infra_instance_public_ips" {
  value = module.prod-infra.instance_public_ips
}
In this main.tf, you’re defining three modules (dev, stage, prod) using the same infra module, but you can customize them with different settings such as the EC2 instance type, AMI, S3 bucket name, and DynamoDB table name.even display output of Public ips as well.
3. Create the providers.tf File (AWS Provider Configuration)
This file configures the AWS provider and sets the region and access credentials.
provider "aws" {
  region = "eu-west-1"
}
4. Create the terraform.tf File
This file is used for initialising terraform aws provider.
terraform {
  required_providers {
    aws = {
      source = "hashicorp/aws"
      version = "5.80.0"
    }
  }
}
5. Generate SSH Keys (devops-key and devops-key.pub)
Note : here I have used key name as devops-key , you can create with any name , and replace that every-where that old one appears,
To create SSH keys for accessing the EC2 winstances, use the ssh-keygen command:
ssh-keygen -t rsa -b 2048 -f devops-key -N ""- This generates two files:
devops-key(private key)devops-key.pub(public key)
Final Directory Structure
At this point, your Terraform project structure should look like this:
├── devops-key        # Private SSH key for EC2 access
├── devops-key.pub    # Public SSH key for EC2 access
├── infra
│   ├── bucket.tf
│   ├── dynamodb.tf
│   ├── ec2.tf
│   ├── output.tf
│   └── variable.tf
├── main.tf           # Defines environment-based modules
├── providers.tf      # AWS provider configuration
├── terraform.tf      # Backend configuration for state management
Next Steps
Run the following commands to initialize, plan, and apply your Terraform setup:
a. terraform init : Initialize Terraform with the required providers and modules

b. terraform plan : Review the plan to apply changes

c. terraform apply : Apply the changes to provision infrastructur

You can see below that all instance, buckets, dynamodb are running or created, which is created through Terraform :
- Instances :

- Buckets :

- DynamoDb tables:

Before using the private key, ensure that it is securely encrypted by setting proper permissions. This prevents other users from accessing it. Run the following command to restrict the access:
chmod 400 devops-key # Set read-only permissions for the owner to ensure securityThis command ensures that the private key (devops-key) is only readable by you, preventing others from accessing or modifying it.
After provisioning, you can SSH into the EC2 instances using the generated devops-key:
ssh -i devops-key ubuntu@<your-ec2-ip>
Terraform steps done, now going to setup with ansible
5. Creating dynamic inventories in ansible dir
Firstly navigate to ansible dir which would you have created before
Step 1: Create the Inventories Directory
mkdir -p inventories/dev inventories/prod inventories/stgStep 2: Add Inventory Content for Each Environment
For inventories/dev:
[servers]
server1 ansible_host=3.249.218.238
server2 ansible_host=34.241.195.105

[servers:vars]
ansible_user=ubuntu
ansible_ssh_private_key_file=/home/amitabh/devops-key
ansible_python_interpreter=/usr/bin/python3
For inventories/stg:
[servers]
server1 ansible_host=34.244.89.121
server2 ansible_host=34.242.151.189

[servers:vars]
ansible_user=ubuntu
ansible_ssh_private_key_file=/home/amitabh/devops-key
ansible_python_interpreter=/usr/bin/python3
For inventories/prod:
[servers]
server1 ansible_host=3.252.144.3
server2 ansible_host=63.34.12.124
server3 ansible_host=34.244.48.139

[servers:vars]
ansible_user=ubuntu
ansible_ssh_private_key_file=/home/amitabh/devops-key
ansible_python_interpreter=/usr/bin/python3
Resulting Directory Structure
inventories
├── dev
├── prod
└── stg
6. Creating playbook for installing Nginx on all servers
Step 1: Navigate to the Ansible Directory
If you’re not already in the Ansible directory, navigate to it first:
cd ../ansibleStep 2: Create the playbooks Directory
Create the playbooks directory inside the Ansible directory:
mkdir playbooksStep 3: Navigate to the playbooks Directory
Now, navigate into the playbooks directory:
cd playbooksStep 4: Create the install_nginx_playbook.yml File
Create the install_nginx_playbook.yml file with the following content to install Nginx and render a webpage using the nginx-role:
---
- name: Install Nginx and render a webpage to it
  hosts: servers
  become: yes
  roles:
    - nginx-role
Step 5: Verify the Directory Structure
After completing the above steps, your Ansible directory structure should look like this:
ansible
├── inventories
│   ├── dev
│   ├── prod
│   └── stg
├── playbooks
│   └── install_nginx_playbook.yml
7. Now initializing Roles for nginx named nginx-role from ansible galaxy
Here are the steps to initialize the nginx-role using Ansible Galaxy, which will generate the necessary folder structure for managing all tasks, files, handlers, templates, and variables related to the Nginx role.
Step 1: Navigate to the playbooks Directory
If you’re not already in the playbooks directory, navigate to it:
cd ansible/playbooksStep 2: Initialize the nginx-role Using Ansible Galaxy
Now, use the ansible-galaxy command to initialize the nginx-role:
ansible-galaxy role init nginx-roleThis will create the following directory structure within the nginx-role folder:
nginx-role
├── README.md
├── defaults
│   └── main.yml
├── files
│   └── index.html
├── handlers
│   └── main.yml
├── meta
│   └── main.yml
├── tasks
│   └── main.yml
├── templates
├── tests
│   ├── inventory
│   └── test.yml
└── vars
    └── main.yml
Step 3: Add Custom Tasks and Files to Your nginx-role
Now that your role structure is ready, you can add your custom tasks and files.
3.1: Add tasks/main.yml
Create a tasks/main.yml file under the nginx-role/tasks/ directory. This file will contain all the steps to install, configure, and manage the Nginx service. Here’s the content for your tasks/main.yml:
---
# tasks file for nginx-role

- name: Install nginx
  apt:
    name: nginx
    state: latest

- name: Enable nginx
  service:
    name: nginx
    enabled: yes

- name: Deploy webpage
  copy:
    src: index.html
    dest: /var/www/html
This will ensure that:
- Nginx is installed with the latest version.
- Nginx service is enabled and starts automatically.
- The
index.htmlfile is copied to the/var/www/htmldirectory, which is where the default Nginx webpage is served from.
3.2: Add a Custom index.html File
You can add an index.html file under the nginx-role/files/ directory. This file can be customized as per your needs. Here’s a simplified version of the index.html file you provided, with basic content:
<!DOCTYPE html>
<html lang="en">
<head>
    <meta charset="UTF-8">
    <meta name="viewport" content="width=device-width, initial-scale=1.0">
    <title>Amitabh's DevOps Journey</title>
    <style>
        body {
            font-family: 'Segoe UI', Tahoma, Geneva, Verdana, sans-serif;
            background-color: #121212;
            color: #e0e0e0;
        }

        header {
            background: #1e1e2f;
            color: #f5f5f5;
            text-align: center;
            padding: 50px 20px;
        }

        header h1 {
            font-size: 40px;
            color: #ff6f61;
        }

        footer {
            text-align: center;
            background: #181818;
            color: #bdbdbd;
            padding: 20px;
        }

        footer a {
            color: #ff6f61;
        }
    </style>
</head>
<body>

    <header>
        <h1>Amitabh's DevOps Journey</h1>
    </header>

    <footer>
        <p>Created by Amitabh | <a href="https://www.linkedin.com/in/amitabh-devops/">LinkedIn</a> | <a href="https://github.com/amitabhdev">GitHub</a></p>
    </footer>

</body>
</html>Note: You can replace this HTML content with your own custom webpage content as needed. The goal here is to serve a simple webpage as part of the Nginx configuration.
8. To add the update_inventories.sh script to your Ansible directory and integrate it with your existing setup, follow these steps:
Step 1: Create the update_inventories.sh Script
In your ansible directory, create a new file named update_inventories.sh with the following content. This script will dynamically update the inventory files for dev, stg, and prod environments based on the IPs fetched from the Terraform outputs.
#!/bin/bash

# Paths and Variables
TERRAFORM_OUTPUT_DIR="/mnt/c/DevOps-learning/Train-With-Shubham/Terraform-ansible-project/terraform"  # Replace with the actual Terraform directory path
ANSIBLE_INVENTORY_DIR="/mnt/c/DevOps-learning/Train-With-Shubham/Terraform-ansible-project/ansible/inventories"

# Navigate to the Terraform directory
cd "$TERRAFORM_OUTPUT_DIR" || { echo "Terraform directory not found"; exit 1; }

# Fetch IPs from Terraform outputs
DEV_IPS=$(terraform output -json dev_infra_instance_public_ips | jq -r '.[]')
STG_IPS=$(terraform output -json stg_infra_instance_public_ips | jq -r '.[]')
PROD_IPS=$(terraform output -json prod_infra_instance_public_ips | jq -r '.[]')

# Function to update inventory file
update_inventory_file() {
    local ips="$1"
    local inventory_file="$2"
    local env="$3"

    # Create or clear the inventory file
    > "$inventory_file"

    # Write the inventory header
    echo "[servers]" >> "$inventory_file"

    # Add dynamic hosts based on IPs
    local count=1
    for ip in $ips; do
        echo "server${count} ansible_host=$ip" >> "$inventory_file"
        count=$((count + 1))
    done

    # Add common variables
    echo "" >> "$inventory_file"
    echo "[servers:vars]" >> "$inventory_file"
    echo "ansible_user=ubuntu" >> "$inventory_file"
    echo "ansible_ssh_private_key_file=/home/amitabh/devops-key" >> "$inventory_file"
    echo "ansible_python_interpreter=/usr/bin/python3" >> "$inventory_file"

    echo "Updated $env inventory: $inventory_file"
}

# Update each inventory file
update_inventory_file "$DEV_IPS" "$ANSIBLE_INVENTORY_DIR/dev" "dev"
update_inventory_file "$STG_IPS" "$ANSIBLE_INVENTORY_DIR/stg" "stg"
update_inventory_file "$PROD_IPS" "$ANSIBLE_INVENTORY_DIR/prod" "prod"

echo "All inventory files updated successfully!"
This script will:
- Navigate to the Terraform directory and fetch the public IPs of the instances for dev, stg, and prod environments.
- Dynamically generate or update the corresponding inventory files in the
ansible/inventoriesdirectory. - Add common variables for all servers in each environment’s inventory file.
Step 2: Verify the Directory Structure
After adding the script, your ansible directory should look like this:
ansible
├── inventories
│   ├── dev
│   ├── prod
│   └── stg
├── playbooks
│   ├── install_nginx_playbook.yml
│   └── nginx-role
│       ├── README.md
│       ├── defaults
│       │   └── main.yml
│       ├── files
│       │   └── index.html
│       ├── handlers
│       │   └── main.yml
│       ├── meta
│       │   └── main.yml
│       ├── tasks
│       │   └── main.yml
│       ├── templates
│       ├── tests
│       │   ├── inventory
│       │   └── test.yml
│       └── vars
│           └── main.yml
├── update_inventories.sh
Step 3: Make the Script Executable
Before running the update_inventories.sh script, ensure that it is executable. You can do this by running the following command:
chmod +x update_inventories.shStep 4: Run the Script
You can now execute the script to update the inventory files with the IPs fetched from Terraform:
./update_inventories.shStep 5: Verify the Inventory Files
After running the script, check the inventories directory. The dev, stg, and prod inventory files should now be updated with the IPs of your servers and the necessary variables.
Example contents of the dev inventory file:
[servers]
server1 ansible_host=192.168.1.10
server2 ansible_host=192.168.1.11

[servers:vars]
ansible_user=ubuntu
ansible_ssh_private_key_file=/home/amitabh/devops-key
ansible_python_interpreter=/usr/bin/python3
Repeat this process for stg and prod environments as well.
Step 6: Use the Updated Inventory in Playbooks
Now that your inventory files are updated, you can reference them in your Ansible playbooks by using the -i option:
- For dev inventory :
ansible-playbook -i inventories/dev install_nginx_playbook.yml
- For stg inventory :
ansible-playbook -i inventories/stg install_nginx_playbook.yml- For prod inventory
ansible-playbook -i inventories/prod install_nginx_playbook.ymlThis will execute the playbook using the updated all(dev,stg,prod) inventory.
Step 7: Varify the all servers whether html page is visible or not (for all inventory like : dev,stg,prod):

9. Final Directory structure for this project
.
├── README.md
├── ansible
│   ├── inventories
│   │   ├── dev
│   │   ├── prod
│   │   └── stg
│   ├── playbooks
│   │   ├── install_nginx_playbook.yml
│   │   └── nginx-role
│   │       ├── README.md
│   │       ├── defaults
│   │       │   └── main.yml
│   │       ├── files
│   │       │   └── index.html
│   │       ├── handlers
│   │       │   └── main.yml
│   │       ├── meta
│   │       │   └── main.yml
│   │       ├── tasks
│   │       │   └── main.yml
│   │       ├── templates
│   │       ├── tests
│   │       │   ├── inventory
│   │       │   └── test.yml
│   │       └── vars
│   │           └── main.yml
│   └── update_inventories.sh
└── terraform
    ├── infra
    │   ├── bucket.tf
    │   ├── dynamodb.tf
    │   ├── ec2.tf
    │   ├── output.tf
    │   └── variable.tf
    ├── main.tf
    ├── providers.tf
    ├── terraform.tf
    ├── terraform.tfstate
    └── terraform.tfstate.backup
10. Infrastructure Destroy
After successfully implementing and managing your infrastructure across multiple environments with Terraform and Ansible, it’s time to clean up and destroy all the resources that were provisioned. This step ensures that no resources are left running, which helps avoid unnecessary costs.
To destroy the infrastructure, follow these simple steps:
- Navigate to the Terraform Directory: Go to the directory where your Terraform configuration files are located. This is typically where your
main.tffile and other Terraform scripts are present.cd /path/to/terraform/directory - Run Terraform Destroy: Execute the following command to destroy all the resources that were created by Terraform. The
--auto-approveflag ensures that you won’t be prompted to confirm the destruction.CopyCopyterraform destroy --auto-approveThis command will:- Destroy all EC2 instances
- Delete all S3 buckets
- Remove any databases or other resources provisioned during the setup
Once the command finishes executing, your infrastructure will be completely torn down, and you will have successfully cleaned up all resources.
This is the final step to ensure that you have a well-managed infrastructure setup that can be recreated anytime using Terraform and Ansible.

Note: Be cautious when running terraform destroy as it will remove all resources, and data in your infrastructure will be lost. Always ensure that you’ve backed up any important data before performing the destruction.
Conclusion of the Project
Congratulations on successfully implementing and managing a multi-environment infrastructure with Terraform and Ansible! Here’s a quick recap of what you’ve achieved:
- Infrastructure Setup with Terraform:
- You began by defining your infrastructure using Terraform, which included provisioning EC2 instances, S3 buckets, and databases across multiple environments: development, staging, and production.
- You followed best practices in managing these resources using Terraform’s modular approach and state management.
- Automating Server Configuration with Ansible:
- After setting up your infrastructure, you leveraged Ansible for configuration management. You initialized and structured an Nginx role using Ansible Galaxy, allowing you to efficiently manage the installation and configuration of Nginx across all environments.
- You also created dynamic inventories for each environment, making it easy to manage server configurations in a scalable way.
- Environment-Specific Configurations:
- By dynamically fetching IPs from Terraform outputs and updating your Ansible inventories, you ensured that each environment had its own specific configuration, enabling streamlined management of resources across dev, staging, and production environments.
- By dynamically fetching IPs from Terraform outputs and updating your Ansible inventories, you ensured that each environment had its own specific configuration, enabling streamlined management of resources across dev, staging, and production environments.
- Simplified Infrastructure Management:
- With Ansible, you automated the installation, configuration, and updates of necessary software (like Nginx), reducing manual effort and human error.
- The use of Terraform and Ansible together allowed you to achieve both infrastructure provisioning and configuration management in a clean, reproducible, and automated way.
- Final Cleanup:
- As a final step, you executed the
terraform destroycommand to tear down the infrastructure that was created. This ensured that you could clean up all resources, including instances, databases, and storage, once the project was completed.
- As a final step, you executed the
This project has provided you with hands-on experience in managing infrastructure and configurations for multiple environments using industry-standard tools like Terraform and Ansible. You have successfully automated your infrastructure management, from provisioning to configuration, across different environments.
You can now apply these skills to any real-world scenario, ensuring that infrastructure is managed efficiently, securely, and consistently across any environment.
Author: Amitabh Soni