Author: Pooja Bhavani
I always wonder how companies manage production-grade applications with so many microservices, how does DevOps actually work in production? I had heard about Terraform, EKS and EKS Auto Mode, GitOps, but how do real teams use it to manage real apps?
Until I Built This. Let’s talk about automating a complete Microservices-Based retail-store-application from infrastructure provisioning to deployment using modern DevOps practices like:
- CI/CD pipelines using GitHub Actions
- GitOps with Argo CD
- Infrastructure as Code with Terraform
| Service | Language | Purpose |
| Cart | Java | It manages shopping cart items |
| Catalog | Go | It handles product listing and details |
| Checkout | Node.js | It coordinates order placement |
| Orders | Java | It processes and stores orders |
| UI | Java | It is the Frontend web interface |
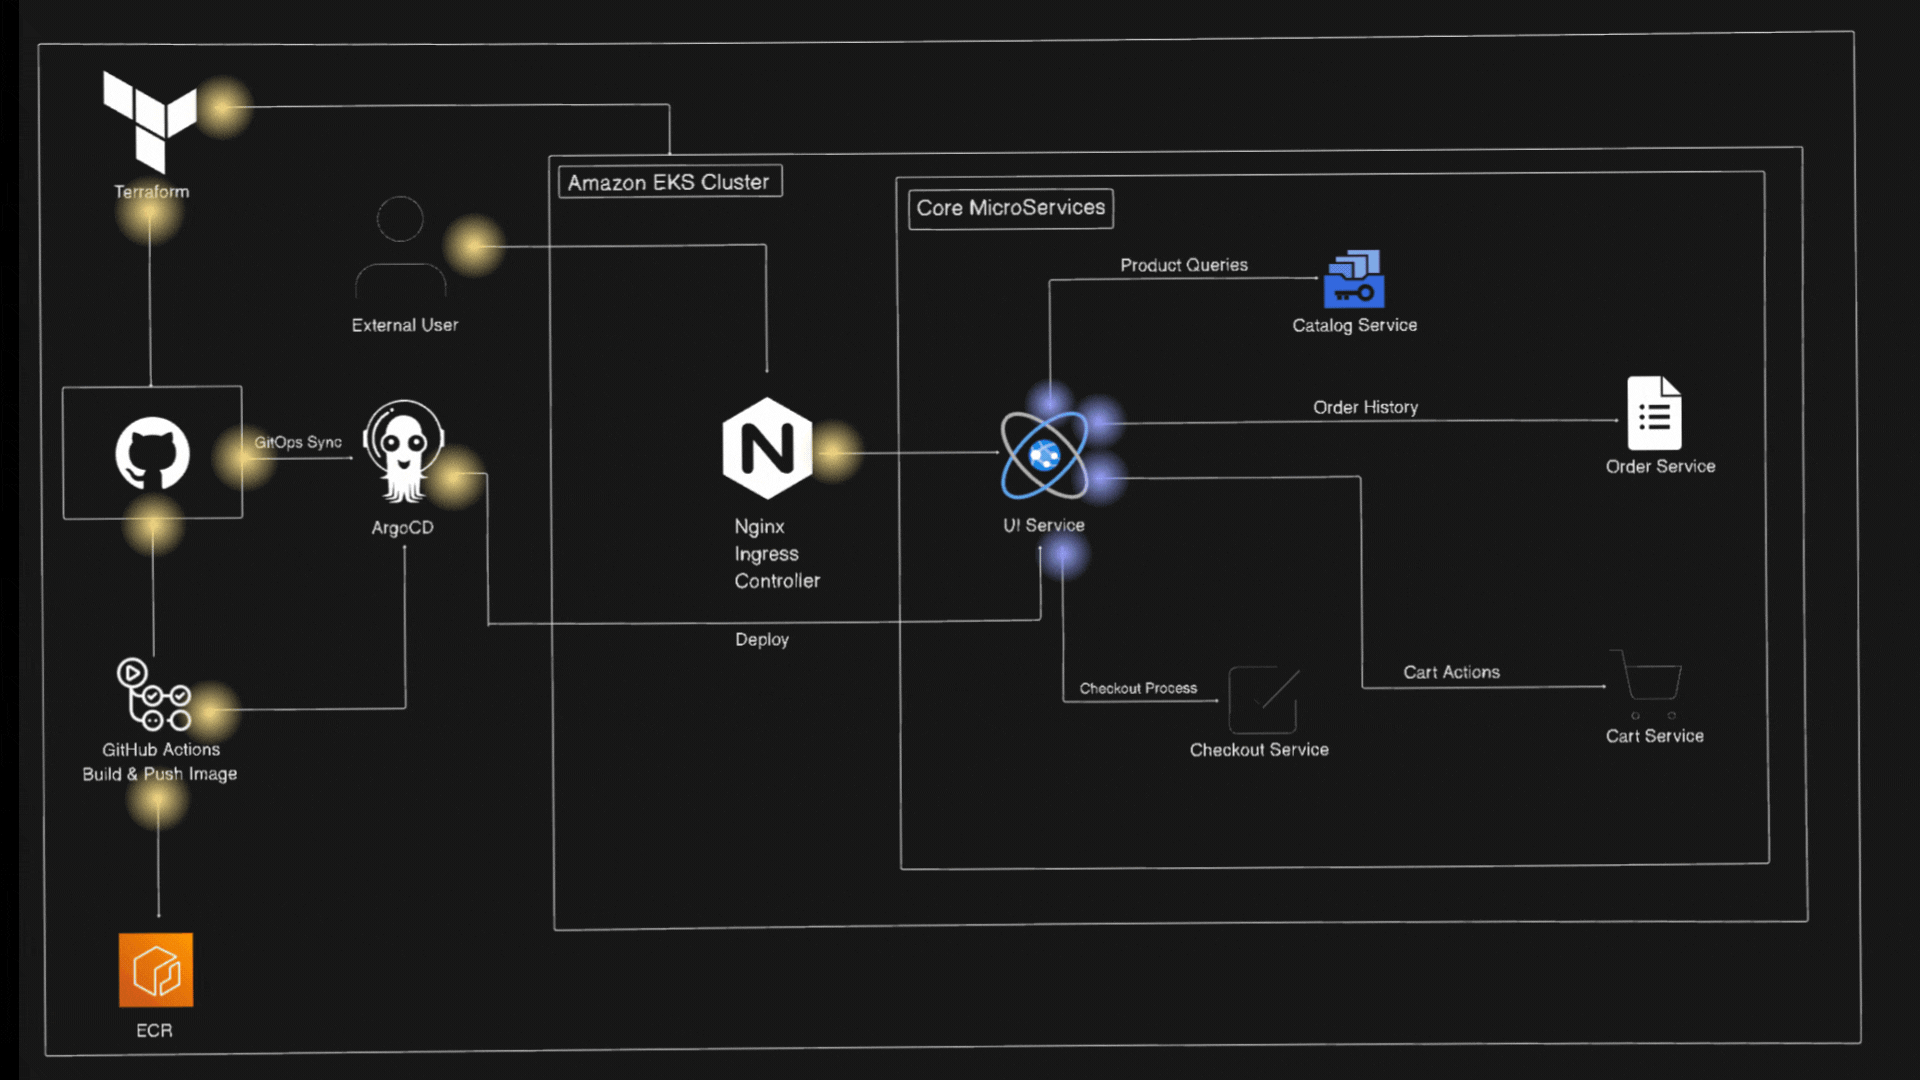
The Infrastructure Architecture follows cloud-native best practices:
- Microservices: Each service is developed, containerized, and deployed independently
- Containerization: All the services are packaged in Docker containers and run on Amazon EKS
- GitOps: Both infrastructure and application deployment are managed declaratively via Git using Argo CD
- Infrastructure as Code: Entire AWS infrastructure (VPC, EKS, IAM, etc.) is defined and provisioned using Terraform
- CI/CD: GitHub Actions will automate the build, test, and deployment pipeline from source to Kubernetes
Architecture Diagram
Let’s first understand about Amazon EKS and EKS Auto-Mode
What is Amazon EKS?
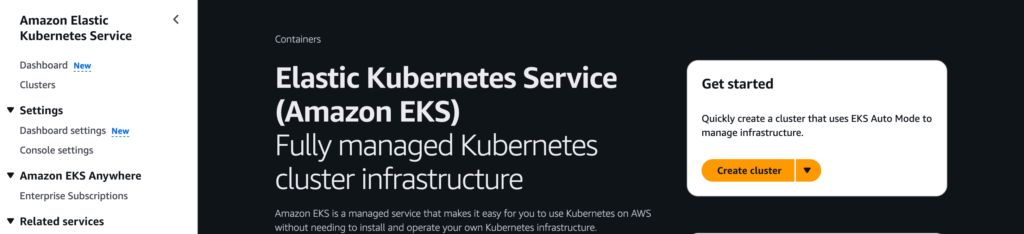
Amazon Elastic Kubernetes Service (EKS) provides a fully managed Kubernetes service. Which makes it easy to run Kubernetes without having to install and operate your own control plane or nodes.
With Amazon EKS we can:
- Deploy and manage containerized applications easily
- Use Kubernetes without managing the underlying infrastructure
- Amazon EKS handles the configuration and operation of the Kubernetes control plane
- Integrate with AWS services like IAM, VPC, ELB, and CloudWatch
- We can either EC2-based nodes for more control or Auto Mode (Fargate) for fully managed, serverless compute.
What is EKS Auto Mode?
Overview
EKS Auto Mode automates Kubernetes cluster management. It lets AWS handle the heavy lifting of infrastructure setup, scaling, and optimization, so you can focus on deploying and managing your apps.
With EKS Auto Mode, you don’t need to manually configure EC2 nodes, autoscalers, or load balancers. It automatically handles the provisioning and scaling of compute resources for your Kubernetes workloads, making cluster operations easier and more efficient.
Features
- Streamline Kubernetes Cluster Management: It simplifies the way you manage Kubernetes clusters on AWS. It takes care of the setup, scaling, and updates so that you can focus more on your applications and less on infrastructure.
- Application Availability: It dynamically adds or removes nodes in your EKS cluster based on the demands of K8s applications so you don’t have to manage EC2 nodes manually.
- Security: EKS Auto Mode automatically replaces nodes every 21 days (or sooner, if configured), it helps you to ensure they’re running the latest secure version of the node image. This helps you to keep your cluster up to date and reduces security risks without any manual intervention.
- Automated Upgrades: EKS Auto Mode keeps your cluster and nodes up to date with the latest patches. It follows the rules you set for disruptions (like PDBs and NDBs) to avoid downtime. If something blocks the update and the 21-day limit is near, you might need to fix it manually.
- Customizable NodePools and NodeClasses: If the workload requires changes to compute, storage, or networking configuration. EKS Auto Mode lets you create your own NodePools and NodeClasses. You shouldn’t change the default ones, but you can add new custom ones to fit your needs.
Project Implementation
Let’s break down how everything comes together — from infrastructure provisioning to app deployment.
We’ll implement the project in two phases using Terraform and GitOps.
First create infrastructure using Terraform in two phases
Terraform
Let’s understand What is Terraform And Why Terraform?
Overview
Terraform is an open-source Infrastructure as Code (IaC) tool developed by HashiCorp. This allows you to define, provision and manage the could infrastructure resources with simple configuration files.
Instead of clicking through the AWS console, you can simply define your set of resources in terraform files to automatically set up your infrastructure
Features
- Infrastructure as Code (IaC): You can define your entire infrastructure setup in declarative configuration files (
.tffiles). - Automation and Reusability: You can write terraform modules to orginize your code and make it reusable across different environments avoiding repetition of code.
- State Management: It maintains the current state of your infrastructure in a state file, allowing Terraform to track and update only what’s changed.
- Immutable Infrastructure: It encourages creating new infrastructure rather than modifying existing one, reducing risks and downtime.
Phase 1: Provision AWS Infrastructure with Terraform
When you run Init it initializes the working directory and Creates a hidden .terraform/ directory to store internal metadata.
terraform init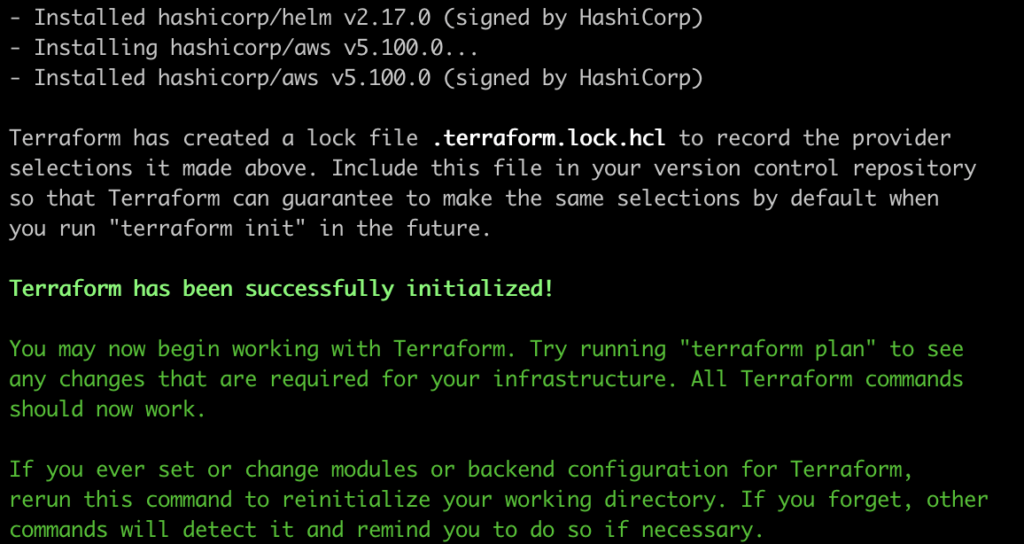
To Setup EKS Cluster
terraform apply -target=module.retail_app_eks -target=module.vpc --auto-approve

Update kubeconfig to Access the Amazon EKS Cluster
This creates the core infrastructure, including:
- Security groups and IAM roles and Policies
- VPC with public and private subnets, Route Tables, IGW, NAT Gateway
- Amazon EKS cluster with Auto Mode enabled
Phase 2: Enable GitOps with Argo CD + Ingress Setup
Once you update kubeconfig, Apply remaining Terraform components:
terraform apply --auto-approve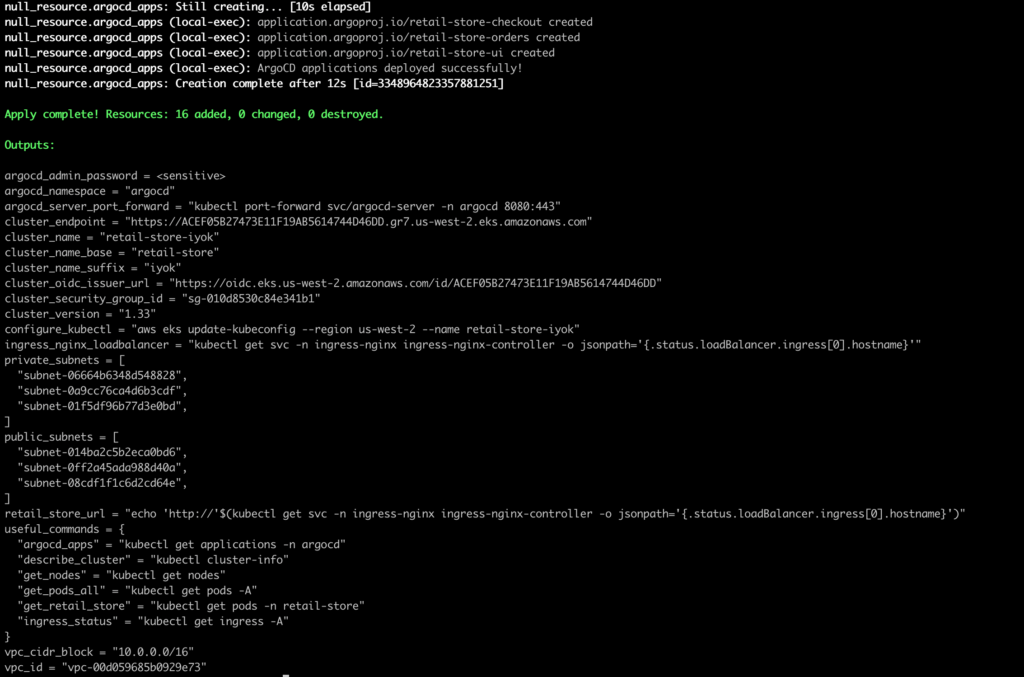
This installs:
- Argo CD (GitOps controller)
- NGINX Ingress Controller
- Cert Manager (for optional SSL)
Once you apply, Argo CD will be available, and all microservices can be managed through Git-based deployments.
GitHub Actions
Overview
GitHub Actions is an CI/CD continuous integration and continuous delivery platform that automates your software workflows such as building, testing and deploying Pipeline directly from your GitHub repository. So Whenever you push or commit any changes in your repository GitHub Actions can automatically trigger workflows. You can run a workflow to automatically add the appropriate labels whenever someone creates a new issue in your repository.
With GitHub Actions, you can automate tasks like:
- Running tests
- Building Docker image and pushing images to registries like DockerHub or Amazon ECR
- Deploying to AWS, Azure, or GCP
- Linting and formatting code
- Sending notifications (e.g., to Slack)
- And much more!
Components of GitHub Actions
Workflow
It is an automated process that runs one or more jobs. It helps you to automate things like building, testing, or deploying your code.
- Workflows are written in a YAML file.
- These files are stored in the
.github/workflows/folder inside your repo. - A workflow runs whenever:
- Code is pushed
- A pull request is created
- A schedule is set
- Or you can manually trigger it
Choosing and using a workflow template
- On GitHub, navigate to the main page of the repository.
- Under your repository name, click Actions.

Events
Event is a specific activity in a GitHub repository that triggers a workflow to run.
Jobs
Job is a group of steps which runs on the same machine (called a runner) as part of your workflow.
Each step can be:
- A shell command (like
npm install) - Or a pre-built action
- Steps inside a job run one after another, and they share data.
Actions
Action is an pre-defined, reusable set of code which performs specific tasks within a workflow and reduces the amount of repetitive code you write in your workflow files.
Actions can perform tasks such as:
- Pull your code from GitHub repository
- Setting up the correct tools for your build environment
- Setting up authentication to your cloud provider
Runners
Whenever your workflow is triggered (like on a push or pull request), a runner takes the job and executes the steps you wrote in your workflow file. Each runner can run a single job at a time. GitHub provides Ubuntu Linux, Microsoft Windows, and macOS runners to run your workflows.
Let’s the Difference Between Jenkins and GitHub Actions
| Feature | GitHub Actions | Jenkins |
| Type | It is an cloud-based CI/CD integrated with GitHub | It is an self-hosted open-source CI/CD server |
| Setup | No setup required (works out of the box in GitHub) | Requires manual installation and setup |
| UI | Modern, integrated into GitHub UI | Traditional web UI, plugin-based |
| Workflow Language | YAML | Groovy or pipeline DSL |
| Where it runs | Runs on GitHub’s hosted runners (or your own self-hosted runners) | Runs on your own server or cloud instance (you manage it) |
| Pipeline config file | YAML files inside .github/workflows/ | Jenkinsfile (Groovy syntax) |
| Customization | Easy to use, good for standard workflows | Very flexible but more complex |
Set up CI/CD with GitHub Actions
This step is needed for production-grade automation.
For GitHub Actions, first configure secrets so the pipelines can be automatically triggered:
Create an IAM User, policies, and generate credentials
Go to your GitHub repo → Settings → Secrets and variables → Actions → New repository secret.
| Secret Name | Value |
AWS_ACCESS_KEY_ID | Your AWS Access Key ID |
AWS_SECRET_ACCESS_KEY | Your AWS Secret Access Key |
AWS_REGION | region-name |
AWS_ACCOUNT_ID | your-account-id |
Once you setup all the credentials make a change in any of the file and GitHub Actions will be automatically triggered.

ECR Repositories where Images are Pushed by GitHub Actions
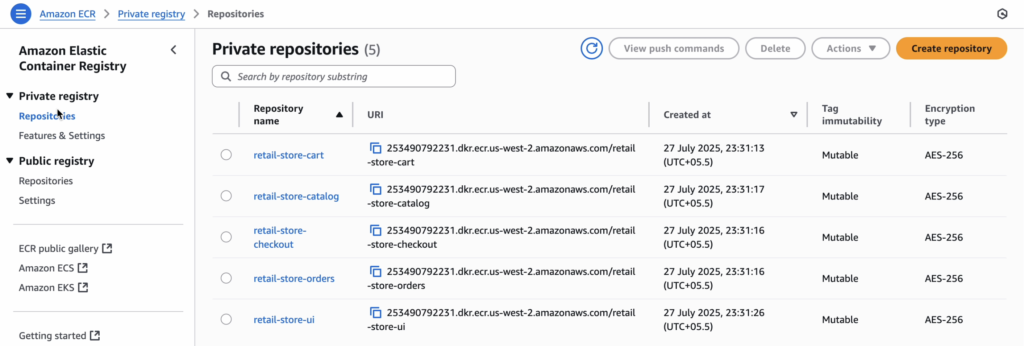
CI/CD Pipeline Flow
- Any changes to GitHub (e.g., UI or Cart) and GitHub Actions will be automatically triggered.
- GitHub Actions:
- GitHub Actions will automatically build and push the updated Docker images to Amazon ECR.
- Tag & push to Amazon ECR
- Update Helm manifest with new image tag
- Commit the change
GitOps
Now Let’s Explore what is ArgoCD?
GitOps is a way of managing infrastructure and application configurations using Git repositories as a single source of truth to deliver infrastructure as code (IaC). So whenever you make any change to your app or infrastructure modifying configurations, updating replicas, deploying a new version), you update a file in Git.
GitOps tools (like Argo CD or Flux) continuously monitors the repository and automatically apply those changes to the actual environment to match the declared desired state.
It relies on a declarative approach of the desired state of the system. By using declarative tools, all configuration files and source code can be version controlled in Git.
GitOps delivers:
- A standard workflow for application development.
- Increased security from greater visibility and auditability.
- Improved reliability with visibility and version control through Git.
- Consistency across clouds, clusters, and on-premise environments.
Difference Between FluxCD and ArgoCD
| Feature | Flux CD | Argo CD |
| Philosophy | Extensible toolkit | All-in-one platform |
| User Interface | CLI-driven; third-party UI needed | Built-in, feature-rich web UI |
| Architecture | Modular controllers (Source, Kustomize, Helm) | Monolithic app with multiple internal components |
| Multi-tenancy | Uses Kubernetes RBAC | Has its own built-in RBAC system |
| Customization | Highly extensible and customizable | More opinionated, less customizable |
| Ease of Use | Steeper learning curve (modular design) | Beginner-friendly and more approachable |
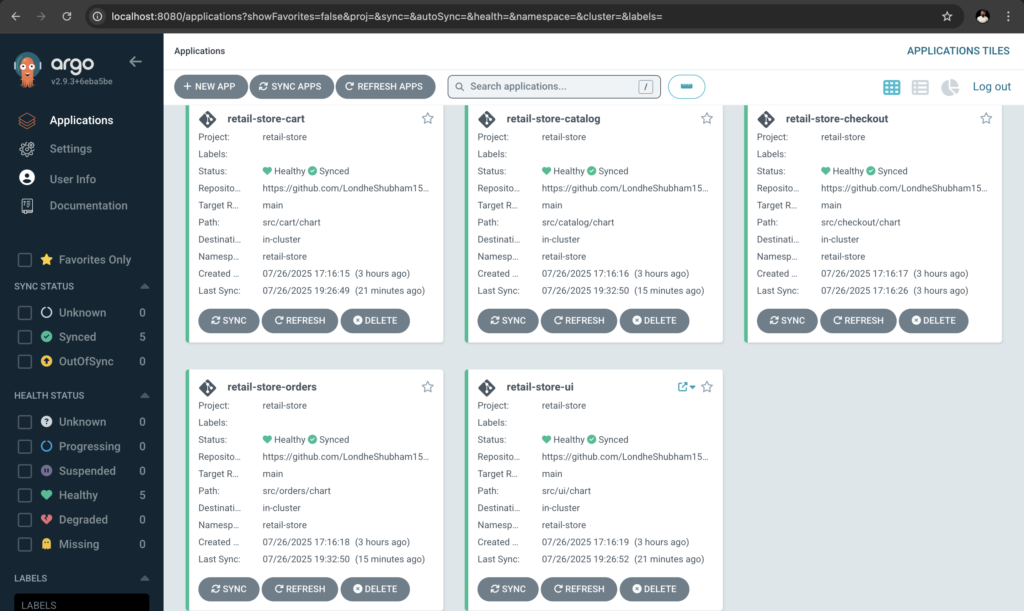
Argo CD fetches the manifest and deploys to EKS
The ArgoCD UI provides:
- Application Status: Real-time sync status of all services
- Resource View: Detailed view of Kubernetes resources
- Sync Operations: Manual sync and rollback capabilities
- Health Monitoring: Application and resource health status
Access the Application
kubectl get svc -n ingress-nginxThe app will be exposed via NGINX Ingress Controller.

Final Verification Steps
kubectl get nodes→ EKS cluster nodes are running- Argo CD UI shows services are in sync
- GitHub Actions runs on every push to
mainorproductionbranch - Application is live on the Load Balancer URLBy following this detailed guide
By following this detailed guide
You’ve now:
- Deployed a production-grade microservices app
- Used Terraform to provision AWS infrastructure
- Integrated CI/CD pipeline with GitHub Actions
- Implemented GitOps with Argo CD
Good luck, try it out
Repository Link: https://github.com/LondheShubham153/retail-store-sample-app
You can reach out to me on LinkedIn.